
How I Made "That Awesome Shade"
Shades of the Sea is my creation for the International Window Coverings Expo Artisan Project. It's constructed with shades of blue silk dupioni and consists of 4 elements: a soft cornice with layered bands of color and beaded fringe, a swag with a larger beaded fringe, drapery panels with horizontal color blocking, and THAT shade. That awesome layered, motorized shade that everyone was talking about at the show. What a thrill it was to have my work admired by people who know and love window treatments.


The layered Roman shade was first created by Liz Ware of Details Pattern Company. The pattern is only available to professional workrooms who fabricate to WCMA shade safety standards. Click the link and contact Liz directly to order a pattern.

I've made this style of shade a few times for clients. I always make it as an outside mount shade and I put returns on the top layer to hide the lift mechanism. I prefer to motorize these shades so that the stacking of the layers can be appreciated from across the room. However, a manual lift system can be used.
I knew that the shaped layers would be perfect for depicting the waves of the Caribbean. For my Artisan Project I was using silk dupioni and I was concerned about a smooth finish with no puckers or wrinkles. I modified Liz Ware's method of sewing the layers of face fabric, interlining, and lining. Instead, I used skirtex and made each layer like a soft cornice.

Another modification to the pattern is angling the top of the sides about 1/4" so that the top of the shade layers match the width of the shade backing. The shade backing is cut 1/2" narrower than the finished width of the shade so that it won't peek out.
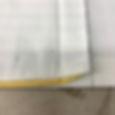
This example is not my Artisan Project, but illustrates the angled top of the layer.
Sealah tape was used to put together the shade layers which were interlined, edged with micro cording, and trimmed with beaded fringe. Each shade layer was finished with Outblack blackout lining for a smooth ravel-free finish.


Applying fringe adhesive to attach blackout lining to back of shade layer.
Black out lining was used because it does not ravel and there is no need to gimp the edges which would have added bulk and drag on the layer underneath.

The shade backing was cut from sateen lining and hemmed with double one inch hems. The shade backing is 1/2" narrower than the shade layers.
Lines were drawn on the inside of the shade backing for placement of the shade layers. The maximum distance between layers is 8" for shade safety.

This is a different shade, but shows how the layers are attached to the backing with two layers of stitching (or two rows of Sealah tape) which form the pocket for a rib at the top of each layer. The bottom most layer is attached first. Then it is flipped down and the next layer is added above it.

After all of the layers are attached to the backing, the ribs are inserted. Then the shade is turned over and shade rings are sewn at the ribs. The ribs stabilize the shade and require fewer columns of rings. This shade is 46" wide and has 3 columns of rings.
The shade is strung using Safe T Shade ring locks which prevent the lift cords from being pulled horizontally and forming a dangerous loop. The ring locks also act as spacers and offset the layers as the shade is raised. Additional ring locks, spacers, or beads could be used to create more space between the layers.

Finally the shade is mounted and motorized with the MOTORIZED ProLift® Professional Lift System.
Here's the back of the completed shade in a raised position. Note the layers and the ring locks. Orbs are still in place. Level locks have not yet been added.

< A weight bar is placed in the bottom hem of the shade backing.
Side view - raised position.
Note that the top layer is made
with returns for this outside mount shade.
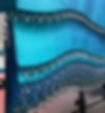
The layered Roman shade is distinctive and makes a big impression -- especially when motorized. You can expect fabrication to take 2 - 3 times longer than a standard flat Roman shade.


